


Question: The Nautilus DevOps team has installed and configured new Jenkins server in Stratos DC which they will use for CI/CD and for some automation tasks. There is a requirement to add all app servers as slave nodes in Jenkins so that they can perform tasks on these servers using Jenkins. Find below more details and accomplish the task accordingly.
Click on the + button in the top left corner and select option Select port to view on Host 1, enter port 8081 and click on Display Port. You should be able to access the Jenkins login page. Login using username theadmin and Adm!n321 password.
Add all app servers as SSH build agent/slave nodes in Jenkins. Slave node name for app server 1, app server 2 and app server 3 must be App_server_1, App_server_2, App_server_3 respectively.
Add labels as below
App_server_1 : stapp01
App_server_2 : stapp02
App_server_3 : stapp03
Remote root directory for App_server_1 must be /home/tony/jenkins, for App_server_2 must be /home/steve/jenkins and for App_server_3 must be /home/banner/jenkins.
Make sure slave nodes are online and working properly.
Note:
You might need to install some plugins and restart Jenkins service. So, we recommend clicking on Restart Jenkins when installation is complete and no jobs are running on plugin installation/update page i.e update centre. Also, Jenkins UI sometimes gets stuck when Jenkins service restarts in the back end. In this case, please make sure to refresh the UI page.
For these kind of scenarios requiring changes to be done in a web UI, please take screenshots so that you can share it with us for review in case your task is marked incomplete. You may also consider using a screen recording software such as loom.com to record and share your work.
This task is based on web UI, you can refer below Video Solution for better understanding
Solution:
1. Click on the + button in the top left corner and select option Select port to view on Host 1, enter port 8081 and click on Display Port. You should be able to access the Jenkins login page. Login using username theadmin and Adm!n321 password.
2. Click Jenkins > Manage Jenkins > Manage Plugins and click Available tab.
Search for SSH & SSH Build Agents plugin and click Download now and install after restart


Refresh your browser for the login screen
3. Add Slave Nodes as per the task


4. Create credentials for tony, steve, and banner as shown below


5. Save & repeat the above steps to add the rest of other slave Nodes
6. Here you would get the error Jenkins failed to Launch agent due to Java missing


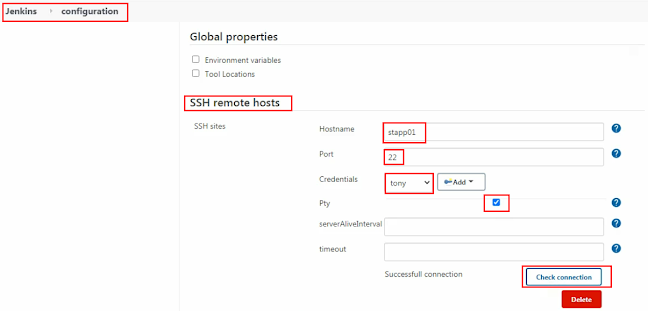
For that, we need to create SSH remote hosts/ssh sites under configuration for all the app servers
8. Create new build Java for installation on all the server

9. Under Build use below remote shell script on the remote host for all app servers
|
echo Ir0nM@n | sudo -S sudo yum install -y
java echo Am3ric@ | sudo -S sudo yum install -y java echo BigGr33n | sudo -S sudo yum install -y java |

10. Build the Job & check the Console output for succesful completion


Repeat the above steps for App Server 2 & Server 3 Nodes
11. Validate the task by all nodes displayed system statistics

12. Click on Finish & Confirm to complete the task successfully
Happy Learning!!!!


4 Comments
Hello and thank you for your support but unfortunately after all steps it sais:
ReplyDeleteStarting agent process: cd "/home/tony/jenkins" && java -jar remoting.jar -workDir /home/tony/jenkins -jar-cache /home/tony/jenkins/remoting/jarCache
Error: A JNI error has occurred, please check your installation and try again
Exception in thread "main" java.lang.UnsupportedClassVersionError: hudson/remoting/Launcher has been compiled by a more recent version of the Java Runtime (class file version 55.0), this version of the Java Runtime only recognizes class file versions up to 52.0
at java.lang.ClassLoader.defineClass1(Native Method)
at java.lang.ClassLoader.defineClass(ClassLoader.java:756)
at java.security.SecureClassLoader.defineClass(SecureClassLoader.java:142)
at java.net.URLClassLoader.defineClass(URLClassLoader.java:473)
at java.net.URLClassLoader.access$100(URLClassLoader.java:74)
at java.net.URLClassLoader$1.run(URLClassLoader.java:369)
at java.net.URLClassLoader$1.run(URLClassLoader.java:363)
at java.security.AccessController.doPrivileged(Native Method)
at java.net.URLClassLoader.findClass(URLClassLoader.java:362)
at java.lang.ClassLoader.loadClass(ClassLoader.java:418)
at sun.misc.Launcher$AppClassLoader.loadClass(Launcher.java:352)
at java.lang.ClassLoader.loadClass(ClassLoader.java:351)
at sun.launcher.LauncherHelper.checkAndLoadMain(LauncherHelper.java:621)
Agent JVM has terminated. Exit code=1
Thanks for commenting and highlighting the issue. It seems issue with the java version. Kindly go through the video & retry the task it should work. still if you face same issue feel free to connect with me online support..
Deletethis worked echo xxxx | sudo -S sudo dnf install java-11-openjdk -y , where xxxx is the password for any of the app servers
ReplyDeleteThank you for commenting and helping others with solution . keep learning
Delete